
Do you get lost trying to find your way around or when trying to find something you already found before?
Here are some tips about how to make this handy feature work for you.
| The Cartography System: The Cartography System was introduced with the Legacy of Ykesha expansion and a few modifications have been made since its release. It is an in game map tool that allows you view and create maps of the areas you visit. |
||
|
It is available under the Map window which can be opened using the M key, the default setting. You can also navigate through the EQ menu to Navigation - Atlas/Map. | |

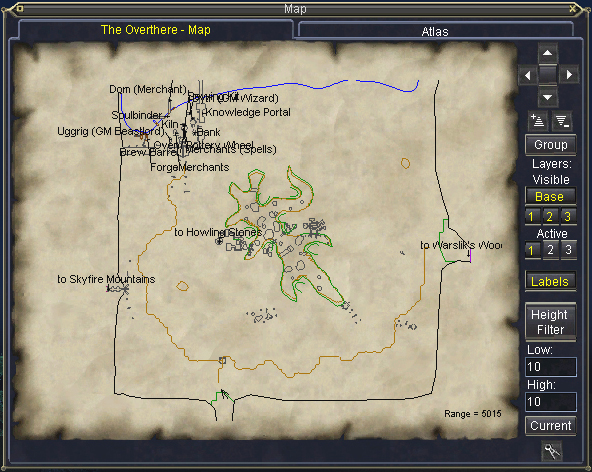
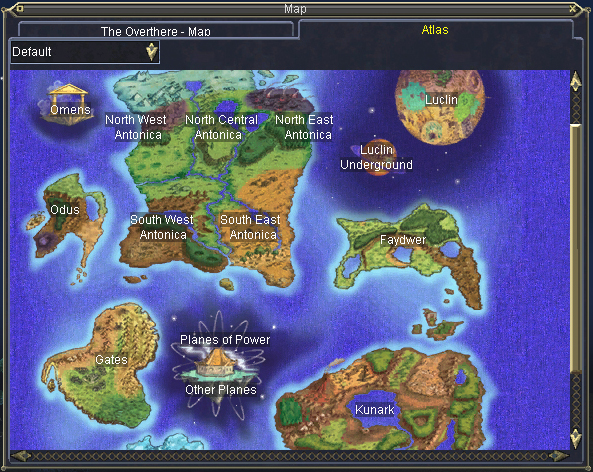
| The Map Window The Map window has two tabs - The current map and Atlas. |
|||
|
|
||
| When you enter a zone, the current map will automatically update to the current zone. The Atlas is a full-color interactive map of the world that can be used to point-and-click from a world view, to a continent view, to a zone view of the maps regardless of which zone you are located. It's very useful for planning your travels. Your character's location on the map is designated by an arrow symbol. The arrow indicates the direction that your character is facing. Customized maps can be created for most zones. However, there may be some zones that restrict access of making a map. |
|||
| Moving the Map - You can move the view of the map around using the scroll and + and - buttons or you can use the mouse. | ||
|
These buttons allow you to scroll up, down, left, or right. Click in the middle of this area to center the map. | |
|
These buttons allow you to zoom in and out. | |
To use the mouse to move the map, hold down the left mouse button while over the map area, then you can drag the map around. Use the Mouse Wheel to zoom in and out. |
||


| Group - The Group button toggles the display of group members in the current zone. |
| Layers - Each zone map has four layers. The first layer is reserved for default maps that we provide. You can create three additional layers for your maps. You will be able to turn on or off any of these map layers in any combination. |
| Visible - This determines which layers are visible. Base
1 2 3
|
| Active - This determines which layer is active 1, 2 or 3. You can only have 1 active layer at a time. |
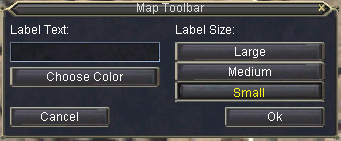
| Labels - This toggles displaying of labels on and off. Labels can be used to enhance your maps. They are markers (a "+" symbol) with text attached. You can choose the color for the label text as well as one of three text sizes. Labels can be edited or removed easily, and you can toggle labels on and off. |
| Height Filter - With this you can toggle filtering lines based on your position and the high and low values. Low
High
When the Height Filter turned off, the entire map will be displayed. If the Height Filter is turned on the map will only display the number of units above (High) and below (Low) the character. You can set the Low and High setting to the numbers that suit you best. In some locations, such as tall buildings or towers, levels of the map too far above or below you aren't really useful, and may be very confusing so the Height Filter will help you to only display what is near you. The default settings for High and Low is 10. |
| Current - If you use the Atlas to scout out different zones, this button will reset the map to the current zone. |
|
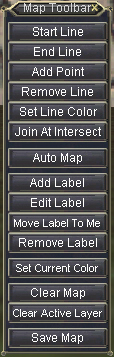
This button will Pop up the Map Toolbar Window. |

| Map Toolbar When drawing maps, you can go to one location, mark that as a starting point for a line, then move to another and mark the end of the line. A line will be drawn between those two points. Or you can draw continuous lines by starting a line and moving around adding points as you go until you choose to end the line. You can also turn on the automatic mode that will start the line where you are and add new points every time your character changes directions until you choose to end the line. Here's a brief description of how each of the buttons on the Map Toolbar work: |
||||
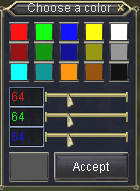
| Start Line - Set down a point where your character is standing. Press the End Line button to finish the line. End Line - Set down a point where your character is standing, and end the line. Add Point - Add a point onto the current map where your character is standing. This is useful for making turns in a line. Remove Line - Cut out the currently highlighted map line. To remove a line, you need to click on it in the map area. Once it is highlighted, you can use this button to remove it. Set Line Color - Change the current color of the highlighted map line. The default maps use the following convention for colors:Terrain:
Objects:
Auto Map - Adds points to a line when you change direction. Add Label - Add a text label to the map. This allows you to mark a spot on the map that you feel is important. Generally this is done to mark a spot where an NPC.
Edit Label - Change the text of the selected map label. Move Label To Me - Move the selected map label to your current location. Remove Label - Remove the highlighted text label from the map. Set Current Color - Set the color that we will draw the next map line in. Clear Map - Clear all the lines and labels from the entire map. Clear Active Layer - Clear the current layer. Save Map - Saves the map to a file. |
|
|||
| The Files The maps files are stored in the default directory path of: C:\Program Files\Sony\EverQuest\maps Base layers - The base layers are the files that zone names without any numbers. Customized layers – The customized layers have the zone names and have 1, 2, or 3 to represent the corresponding layer number. For those of you that like to make changes to your User Interface, the UI files for the maps are: EQUI_MapViewWnd.xml EQUI_MapToolbarWnd.xml |
Do's and Don'ts for Making Maps
|
| Useful Links EQ Atlas - Comprehensive and extremely detailed maps of many of the zones in Norrath. Don't leave the tavern without it! EQInterface - The largest and most comprehensive collection of User Interfaces. And the best source for User Interface discussions. You can find customizes map window and toolbars on this site. Allakhazam's Magical Realm - A massive item database, quest info, and more! You can use this site to help track down NPCs that you may want to make labels for on your maps. |