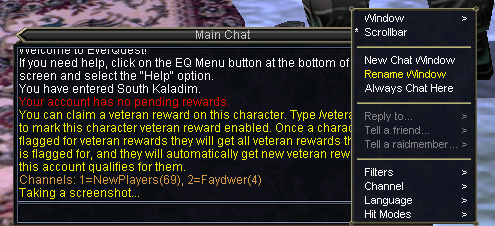
Main Chat Window The Main Chat Window is by default located on the bottom center of your screen and has a title bar labeled Main Chat. The window has thread basic parts – the title bar, the display area, and the chat bar. The title bar displays the label name of the window, the display area shows all of the chat that is filtered to display in the window, and the chat bar is where you type in text that you want to send to other players in the game. When you right-click along the edges of the window, an options list will appear. Along with the standard window options, there are several options unique to the Chat Window. - New Chat Window - This option creates an additional chat window in the default location (this means that if you have not moved your Main Chat Window the new chat window will appear on top of the Main Chat window.) New chat windows have all the options available to the Main Chat Window but they start out with all filters on by default. This means that no chat will appear in new chat windows unless you turn at least one of the filters off.
One really handy use of multiple chat windows is to keep track of guild (or group) chat independent of other chat. This is easy to do. Just right-click the Main Chat Window and select New Chat Window. Position the new window where you want it, then right-click in that window and choose Filters then Guild. The new window will now only show you messages from your Guild. At this point you may also want to switch the filter for Guild in you main chat window so that it will not show up there. Using Shift-Page Up and Shift-Page Down will allow you to scroll through chat windows in much the same way that the mouse wheel does. - Rename Window - this option lets change the label on the title bar.
- Always Chat Here - This will determine where you automatically chat when hitting Enter.
- Filters - Selecting Filters will display a list of the types of text messages that you can filter (say, tell, group, guild, OOC, auction, shout, emotes, chat channel, melee, spells, skills and other: other is everything not listed previously). Selecting an item from the list toggles the text type on or off. Remember, by default your Main Chat Window shows all text and New Chat Windows show no text.
- Channel - The channel selection sets the default channel that your character speaks to (say, tell, group, guild, OOC, auction and chat channels). By default this is set to Say. So if you just type into the chat bar you will be speaking in /say. If you change the channel to OOC, then your default chat will be sent to the /ooc channel.
- Language - the Language selection sets the default language for the chat window. The option will list all languages that your character can speak. Choosing a language from the list sets it as your default chat language. Common is set as the default all chat windows.
- Hits Modes - This option lets you set a filter for normal, abbreviated and number only modes of hits. It also let's you filter the hits or misses for melee and spell damage.
Chat Modes - Say (/say text) - Sends your message to all nearby characters. This is the default chat mode, which means that if you do not specify a chat mode, the game will assume that you want to use /say.
- Tell (/tell name) - Sends your message to the name you have typed. If you click on the Use Tell Windows button on the General tab of the options window, all tells you receive will be sent to their own windows.
- Shout (/shout text) - Sends your message to all characters in your current zone. Shout should be used for in-character messages.
- Out of Character (/ooc text) - Sends your message to all characters in your current zone. Out of Character should be used for messages that don't fit within the genre.
- Auction (/auction text) - Sends your message to all characters in your current zone but via an auction channel.
- Group (/gsay text) - Sends a message only to people that are in your group.
- Guild (/gu text) - Sends a message only to people that are in your guild.
- Raid (/rsay text) - Sends a message only to people that are in your raid.
- Fellowship (/fsay text) - Sends a message only to people that are in your fellowship.
- Chat Channels - Chat channels are separate serverwide channels that players can create.
Creating Chat Channels EverQuest players can open or join as many as 10 chat channels above the pre-created channels. The commands and discussion below only apply to these player-created channels, not to the game-wide channels such as /ooc or /shout.
System-owned Chat Channels System owned Chat Channels are persistent chat channels that players will auto join some of these channels. Characters level 20 and under auto join the "NewPlayers" channel Characters level over level 20 auto join "General" and a class specific channel, and there are continent based channels as well. Auto joining channels can be disabled under the options window. To toggle whether you autojoin these general help channels, you can go to Options Menu (Alt O) and under the General Table, there's a button that is labeled, Join General Channels.
Chat System Command List Here is a list of the commands available for using chat channels. Chat channel names are not case sensitive. You can use all lowercase letters if that makes it easier. The exception is creating channels. When you create a channel it will retain the capitalization you use when that name is displayed. But for any other use in the commands below you can use lowercase letter. - /chat set - Makes you a member of all of the channels listed. You will be joined to those channels in the order listed (see /join below for details on what 'joining' a channel means). This will remove you from all previously joined channels. If you just want to join a new channel, use the /join command
- /join - Allows you to join the channel or channels listed. If the channel does not yet exist it will create the channel and you will be added as a moderator for the channel (see below for moderator commands). Note: You may use spaces when creating a channel. But when the channel is created those spaces will be removed. So if you "/join fluffy bunny" the channel created will be "fluffybunny" /leave : This will remove you from the channel. Note: You must specify a channel, either by name or by number, or the command will fail.
- /leaveall - Removes you from all channels /list [channel]: Using this command without the [channel] parameter will list all of the channels that you are joined to, the channel number, and will give a numeric value for the number of people in that channel. The channel number is specific to individual users, so two people in the same channel may not have the same channel number for that channel. Using the command with a [channel] parameter will list the members of the channel by name
- /announce [on | off] - Toggles on and off the announcements heard when people join or leave channels. This is set OFF by default.
- /chat # - Sends the message to the channel named. You must have the # symbol, that is not a hint to use a number.
- /# text - Sends the message to the chat channel number listed. Example: /1 text. You can discover the number of the channels you are joined to by using /list. If no channel number is specified the message will be sent to you first chat channel (whichever is your channel number 1)
- /chat help - Displays a list of chat channel commands
- /chat invite [channel] - Sends an invitation to the specified character to join a the chat channel. If no channel is specified the character will be invited to join your first channel (whichever channel is your channel number 1). The invitation arrives as a text message. If the channel is password protected, the invited person can enter the channel only once without a password
- /chat grant [channel] - Grants moderator privileges in the channel specified to the character named. If no channel is specified the character will be given moderator privileges to your first channel (whichever channel is your channel number 1)
- /chat password [channel] - Sets the password for the channel specified. If no channel is specified the password will be applied to your first channel (whichever channel is your channel number 1). Note: A password protected channel is the only type of channel that is semi-permanent. Such a channel will disappear after it has been empty for 24 hours. All other channels cease to exist once they are empty
- /chat kick [channel] - Kicks the character named off of the chat channel listed. If no channel is specified the character will be kicked our of your first channel (whichever channel is your channel number 1)
- /chat moderate [channel] - Sets the specified channel to 'moderated' mode. This means that only those given 'voice' in the channel will be able to speak in that channel. If no channel is specified your first channel (whichever channel is your channel number 1) will be set into moderated mode. This is a toggle command, so if you execute this command a second time the channel will return to unmoderated status.
- /chat voice [channel] - Give the named character the ability to speak in a moderated channel. If no channel is specified the character will be allowed voice in your first channel (whichever channel is your channel number 1)
Note for advanced users: /chat and / can be replaced with a semicolon ( ; ) in most cases Associated commands Here are a few commands that you can use to make your chat channels even more friendly. - /autojoin - Saves the channels listed and automatically sets you to those channels when you log in. This information is saved in your eqclient.ini file in the [Defaults] section as ChannelAutoJoin=. You can edit that setting in the file while out of game if you wish /usecolor: See the section in this manual for a description of the use of this command.
- /list - Displays of list of people in a channel. To identify the moderator of a player made chat channel, type in the command /list and it'll display the name of all the members of that chat channel. The moderator of the chat channel will be marked with a carrot sign (^) on their name.
Cross Game Chat Channels Players of EverQuest, EverQuest II, Planetside, Vanguard, Matrix and Star Wars Galaxies can easily chat with one another by using specific chat syntax. You can also join chat rooms or send mail to your fellow players. Listed below are instructions on how you can stay in contact with your friends across different SOE titles. (Note: you may use either the semi-colon (;) or the left bracket ([) symbol as both work interchangeably, it's just up to your personal preference. However the slash (/) symbol will only work in EQ on the same server for tells or joining channels) These instructions are for players in EverQuest only, please see instructions for other game titles as they will vary slightly. Sending mail uses the same syntax across games: - To send mail to someone on another EQ server, enter their name as servername.charname
- To send mail to a friend in SWG, enter their name as swg.servername.charname
- To send mail to a friend in EQII, enter their name as eq2.servername.charname
- To send mail to a friend in Matrix, enter their name as mxo.servername.charname
- To send mail to a friend in Planetside, enter their name as ps.servername.charname
- To send mail to a friend in Vanguard, enter their name as vgd.servername.charname
Sending Tells: (you may use [tell, ;tell or shortened to [t, ;t) - To send a tell to a friend on another EQ server, type [t servername.charname
- To send a tell to a friend playing SWG, type [t swg.servername.charname
- To send a tell to a friend playing EQII, type [t eq2.servername.charname
- To send a tell to a friend playing Matrix, type [t mxo.servername.charname
- To send a tell to a friend playing Planetside, type [t ps.servername.charname
- To send a tell to a friend playing Vanguard, type [t vgd.servername.charname
Joining Chat Channels: (you may use [join, ;join or shortened to [j, ;j) - To join a chat channel on a different EQ server, type [j servername.channelname
- To join a chat channel in SWG, type [j swg.servername.channelname
- To join a chat channel in EQII, type [j eq2.servername.channelname
- To join a chat channel in Matrix, type [j mxo.servername.channelname
- To join a chat channel in Planetside, type [j ps.servername.channelname
- To join a chat channel in Vanguard, type [j vgd.servername.channelname
- Across EverQuest servers only, you may even join channels protected with passwords assuming you have the password information. Other titles operate differently or do not use semi-persistent password protected channels. Use the above syntax followed by a colon and then the password. For example: [j servername.channelname:password
- If a channel is contained within other channels (not unusual for SWG), use:
[j swg.servername.grandparentchannelname.parentchannelname.channelname
The EQ server abbreviations for these commands are as follows: The Combine (progression) use combine
Antonius Bayle (Kane) use antonius
Bertoxxulous (Tholuxe Paells) use bertox
Bristlebane (Solusek Ro) use bristle
Cazic Thule (Brell Serilis) use cazic
Drinal (Tarew Marr) use drinal
Druzzil Ro (Xev) use druzzil
Erollisi Marr (Morell-Thule) use erollisi
Fennin Ro (Torvonnilous) use fenninro
Firiona Vie (Roleplay Preferred) use firiona
Luclin (Veeshan) use luclin
Maelin Starpyre (Vazaelle) use maelin
Povar (Morden Rasp) use povar
Prexus (Terris-Thule) use prexus
Quellious (Rodcet Nife) use quellious
Saryrn (Mithaniel Marr) use saryrn
Stromm use stromm
The Nameless (Innoruuk) use nameless
The Rathe (Karana) use rathe
The Seventh Hammer (Lanys T'Vyl) use seventh
The Tribunal (Ayonae Ro) use tribunal
Tunare (E'ci) use tunare
Xegony (Zebuxoruk) use xegony
Zek (PvP) use zek
Functions Descriptions [] = optional parameters = required parameters = [:] = [,...] This means that any place below where it lists you can use the with the password after it (don't forget the colon between the two), or just the channel name where no password is in use. And any place it lists you can use a series of separated by commas. For example: /chat set Voxraidleader:seekrit, Voxraidgroupleader:notsoseekrit, Voxraidgeneral That would set three channels (Voxraidleader, Voxraidgroupleader and Voxraidgeneral), two with passwords (seekrit and notsoseekrit). Though we would suggest shorter channel names.
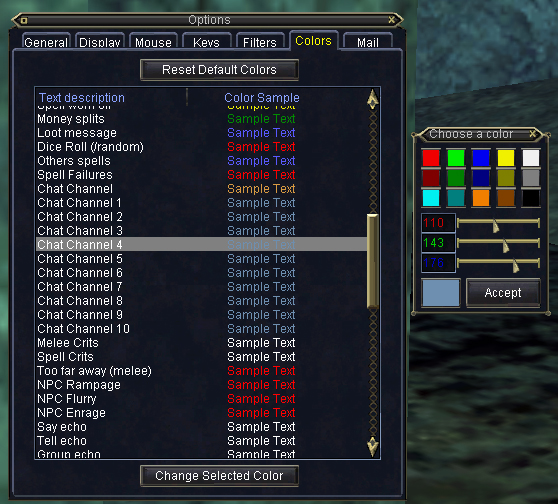
Customizing Your Chat Under the Colors tab of the Options Window (Alt O) YOu can set the colors for any of the chat text. The following /usercolor numbers were added to allow greater customization of your chat channels: 35 – Chat Channel Messages
36 - Chat Channel 1
37 - Chat Channel 2
38 - Chat Channel 3
39 - Chat Channel 4
40 - Chat Channel 5
41 - Chat Channel 6
42 - Chat Channel 7
43 - Chat Channel 8
44 - Chat Channel 9
45 - Chat Channel 10
To offer additional information for this article or to discussion it, join the Chatting in EverQuest discussion over on the official EverQuest forums. |