| What do all those buttons and sliders within the EverQuest Options Window mean? Why do techies always tell me to update my video card drivers whenever I have a graphics problem? Here are some tips on optimizing your Graphic Display Settings for EverQuest: General Graphics Tips When playing video games, a better graphics card will usually result in seeing better graphics quality in game. That doesn't mean you can't play without a top-of-the-line. There are several adjustments you can make in-game and out-of-game to help improve your graphics while balancing performance. Graphics Card Drivers
Often people complain that a tech support representative told them to update their video/graphics card drivers in response to an in-game graphic issue. Usually they will tell you that because… well… you need to update the drivers! If you go long periods of time without updating your video card drivers chances are your video card will not work at its optimal performance or to the extent of its capabilities. Video games and other software programs are constantly providing updates based on new versions of the graphic card drivers. If you have outdated video card drivers you may begin to experience problems. Does this mean you need to update your drivers as soon as new ones are available? No, it doesn't. However, if you start to experience graphic problems, updating the drivers should be one of the first steps you take in resolving the issue. Visit the Station Knowledge Base to view a list of the Latest Supported Video Devices and Driver Versions for EverQuest and to learn more about updating the drivers.. Computer Maintenance
People tend to forgot that their computer need to rest and get refreshed! When you leave your computer on for extended periods of time or for long periods without rebooting it may not perform as well as it should. Reboot your computer if you start to notice graphic or performance problems. Many times our computers need a fresh start at calculating system memory usage. New Equipment
When acquiring new equipment for your computer, such as a new monitor or new graphics card, you may need to adjust in-game and out-of-game display settings to get the ideal image display.
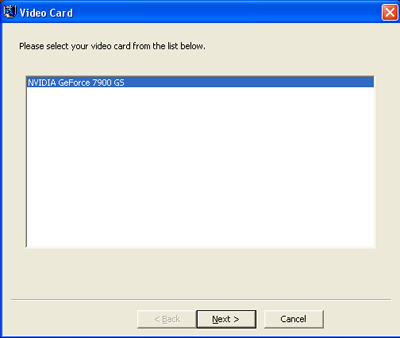
Game Options Settings Before clicking on Play, you have the option to adjust the game settings via the Game Options button on LaunchPad. It will first give you the option to select the video card. Most systems will only have one option but more advanced systems may have multiple options. Model Selection
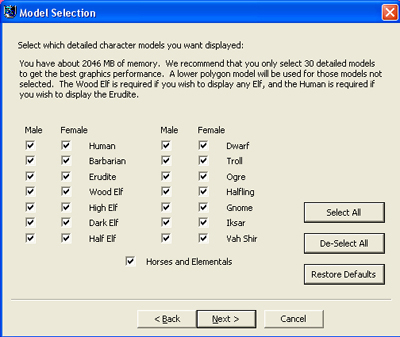
This section allows you to select lower or higher quality character models. It will automatically detect how much memory your computer has and recommend models settings. The Wood Elf is required if you wish to display any of the Elf higher quality model and the Human is required if you wish to display the Erudite. You can adjust these recommendations but if you select more models than recommended it may limit performance. If you have a limited amount of memory available it is recommended to have this off. **Note: Higher quality character settings for the race you play are necessary for displaying mounts. Engine Settings
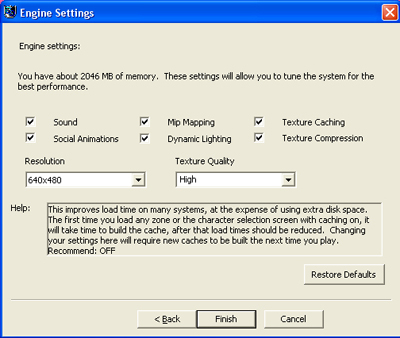
These settings will allow you to tune the system to achieve the best performance. For this article we'll only discussion the ones relating directly to graphics. - Social Animations: Turning this option on will enable the social animations for the detailed models. This option is very memory intensive.
- Mip Mapping: Have this on improves performance because in situations where you don't need to see a lot of detail you can load a less detailed version of a texture, and progressively as you get closer to your texture, you can load bigger textures as needed.
- Dynamic Lighting: This toggles the lighting effect for any light source carried by a player.
- Texture Caching: This improves load time on many systems at the expense of using extra disk space. The first time you load any zone or the character selection screen with caching on, it will take time to build the cache, after that load times would be reduce. Changing your settings here will require new caches to be building next time you play.
- Texture Compression: This option will save memory at the cost of very slight reduction of texture quality.
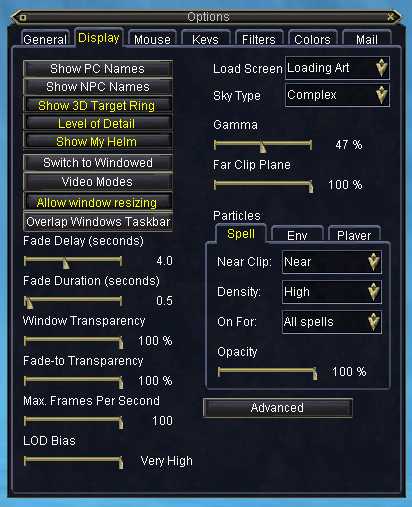
Options Window Settings When logged into EverQuest, you have the option of adjusting some graphics settings via the Display tab under Options Window (Ctrl + O). Some of these settings may require you to zone before they take effect. The default settings are the optimal settings for your graphics cards. You may adjust settings to improve graphics quality or to improve performance. Display Tab These settings allow you to customize how your graphics display on your screen. Show PC Names: When this is toggled on, you will be able to see the names of Player Characters over their heads. You can also toggle this buy using the /Shownames command. This command allows you further options for displaying names. When using the command, you will select what you wish the settings to be. - /shownames off – turns off PC names.
- /shownames 1 – displays only first names.
- /shownames 2 – displays first and last names.
- /shownames 3 – displays first, last, and guild names.
- /shownames 4 – displays everything.
- /shownames 5 – displays prefix title and first name.
- /shownames 6 – displays prefix title, first name, and last name.
Show NPC Names: When this is toggled on, you will be able to see the names of Non-Player Characters over their heads. Toggling PC and NPC helps keep the clutter down when on raids. It also makes for prettier screenshots. Show 3D Target Ring: Displays a colored ring around your target's feet. Level of Detail: When on, the detail levels for distant NPC's and Pc's are reduced. This may improve performance on slower computers. Show My Helm: Toggles whether your helm is visible to you and others or not. Switch to Fullscreen: Sets the current window mode to be full screen. This can also be done using Alt + Enter Video Modes: This button will bring up the Video Modes window. In this window you can select your game resolution, refresh rate and video depth. It is important to note that these options are determined by your hardware and the drivers that run them. If you are seeing fewer options than you were expecting (such as higher resolutions), the first step to correcting this is to see if you can find newer drivers for your video card. - Refresh Rate: This is the speed at which your monitor will refresh the screen. Before making adjustments to this setting, check your monitor's manual for its recommended levels.
- Bit Depth: A higher number here will increase the range of colors and increase the visual display. A lower may help performance.
LOD Bias (Level of Detail): This allows you adjust the Level of Detail graphic settings. The options are Very Low, Low, Normal, High, and Very High. The higher the amount, the more details will be displayed. Load Screen: This allows you pick whether you want to have an image displayed while loading a zone. Displaying an image can help reduce load time for slower systems. Sky Type: Toggles the level of sky details. In some cases you may want to alter this to improve performance. The choices are off, simple or complex. Gamma: Adjusts screen brightness during gameplay. Range: 0 to 100%. Far Clip Plane: The Clipping plane determines how far you can see. In some cases, reducing the clip plane can improve performance. Range: 0 to 100%. Particles: This section allows you to adjust the number of particles displayed during spell effects. In some cases a lower setting may improve performance. You can make adjustments for Spells, the Environment (Env), and Player particles. - Near Clip: Determines how close particles will draw on your screen.
- Density: Determines the thickness of the particles.
- On For: Determines what spell effects are displayed on your screen. Limiting what is displayed may improve performance.
- My spells (Me)
- Group spells
- Raid spells
- All PCs
- Me + NPC
- Group + NPC (includes Me)
- Raid + NPC (includes Me)
- All spells
- Opacity: Determines the transparency of the particles. Range: 0 to 100%
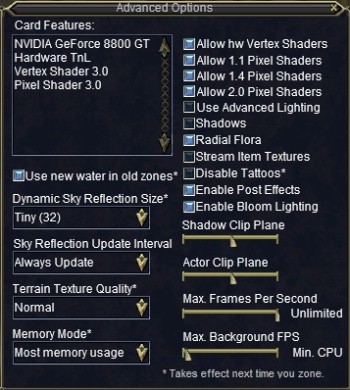
Advanced Options This section is for more advanced users. These settings help improve the graphics display of objects and characters in the world. A default setting based on what is available with your video card will automatically be set. Check for the maximum setting permitted by your graphics card to determine if you want to turn on any of these settings. Card Features: This section displays information about your video card including maximum settings for some of the advance options. Use new water in old zones: This toggles whether or not you see updated water graphics in older zones. Changing this option does not take effect until you zone. Dynamic Sky Reflection Size: This determines the quality of the reflections in the sky graphics. Changing this option does not take effect until you zone. - Tiny (32)
- Small (64)
- Medium (128)
- Large (256)
- Largest (512)
Sky Reflection Update Interval: This determines how often the reflections will update.
- Once per minute
- Every 10 seconds
- Every second
- 5 per second
- 10 per second
- 30 per second
- Always Update
Terrain Texture Quality: This determines how much detail will display on the ground textures. Changing this option does not take effect until you zone. Vertex Shaders: These options determine how much details are displayed on characters and objects per pixel. These options are limited by your graphics cards.
- Allow hw Vertex Shaders (The hw stands for hardware - VS is used to render the actual display. If disabled the video card hardware is no longer used for rendering, it is all moved to software and CPU usage.)
- Allow 1.1 Pixels Shaders
- Allow 1.4 Pixels Shaders
- Allow 2.0 Pixels Shaders
Use Advanced Lighting: Toggles whether dynamic lighting is on or off. It determines whether or not EverQuest is using per pixel or per vertex lighting. Per Pixel Lighting does its own unique lighting calculation for each location on the screen. Per Vertex Lighting simply calculates lighting on each vertex and blends between them. Shadows: Toggles whether or not shadows are displayed. Radial Flora: Toggles whether plants and other flora graphics are displayed. Stream Item Textures: This toggles whether or not item textures are loaded all at once or streamed only when needed. Disable Tattoo: This toggles whether you see Tattoo art on characters. Changes made to this will not take effect until you zone. Shadow Clip Plane and Actor Clip Plane: These determine the distance at which objects and their shadows will be draw. For closer range, slight the meter to the left and for farther range slide it to the right. Post Effects and Bloom Lighting: These effects work best with graphics cards that have pixel shader 2.0 support. Older or lower-end cards may experience trouble with frame rates. If you are experiencing severe lag, try unchecking Bloom Lighting. Unchecking Post Effects may also help. |